Geek Gloves
The temperature in my office has been 68 degrees (F) with very low humidity which sounds warm, but my hands have been freezing! Cold hands make for stiff fingers and difficulty typing. While many of my coworkers solved the problem with individual space heaters I wanted something different, so I started looking for alternatives.
Once upon a time, long before computers entered my life I did alot of knitting. I googled for fingerless gloves and wrist warmer patterns. While there are LOTS of free patterns available, none quite suited me. As is my way, I decided to make my own.
One of my requirements of my geek gloves is that they fit well. Any mitten pattern could be used, but I found they are not well fitted.
For an experinced knitter, the following generalized explanation will probably be enough information for you, if not, google for fingerless mitten patterns and adapt one to suit your needs.
If you want to learn to knit, check your local library for a knitter's guild meeting in your area. Google is an excellent resource for tutorials and patterns.
Thankfully I learned to knit as a child in 4-H. Knitting is like riding a bicycle, once you learn you will never forget!
Geek Gloves General Directions:
Materials
Approximately 4 ounces of worsted weight yarn
Size 3 double pointed needles or use the magic loop technique with a circular needle. I used a smaller than normal needle size to make it really dense.
Cast on 40 stitches, divide evenly between the needles.
Join, mark the beginning of the round and work about 2 inches using a K2 P2 rib pattern
***** After knitting about two inches, slide your hand in and move it up to however far up your arm you want it to go and and see if you need to add/remove stitches or change needle size. Trying it on frequently will let you make adjustments as you go. *****
Continue K2 P2 until the length is about 1 inch before your wrist.
Decrease 3 stitches by purling 2 stitches together once in the middle of each needle. This will draw the glove in a bit and help it not slide around on your wrist.
Knit the knit stitches and purl the purl stitches for ten rounds.
Knit four rounds. or fancy it up with your favorite stitches. Try it on! Is it too loose? If so pull out a few rounds and decrease a few more stiches evenly spaced, or try making the back of the hand in a ribbed pattern as it draws up the material.
On the fifth round, increase a stitch just after the marker at the begining of the round. K1 then increase 1 stitch. Place a second marker to mark the spot to increase and finish the round. Work the next round evenly.
Every other round, increase a stitch after the first marker and just before the last one. On the alternate rows, follow your pattern without increasing or decreasing.
Continue until there are 13 stitches between the markers. Follow the pattern for the next row. At the beginning of the next row, K1 then slide 11 stitches onto a holder and continue to work in your pattern for 2 rows.
Check your glove, consider decreasing a few stitches evenly spaced.
Work your pattern for 2 more rows.
Try on your glove and decide if you want it to extend to your knuckles, or past them. K1 P1 for a few rows to draw the material in a bit and either caste off or continue working until it is the length you want. If you make it too long, it is easy to pull some out.
NOTE: Initially my first pair came past my knuckles felt distracting as I typed and I folded a bit under and intended to pull out a few rows.
However by the end of the day I loved the warmth in my knuckles and have decided the longer length works for me.
Slide your hand into your thumbless geek glove and decide how the thumb opening feels. If your stitches are stored with a piece of yarn as a holder, draw it up around your thumb.
Is it pretty roomy or too tight?
Slide the stored thumb stitches evenly spaced onto the needles. Pick up 3 stitches (more or less as needed) and work in your pattern for about 4 rounds Try it on and decide if you want to decrease a few stitches then work a few more rows
Caste off but try wearing it a bit before you hide the ends as you might want to pull out or add a few rows.
The second glove is identical UNLESS you have added a pattern to the back of the hand. If you did, the second glove will need to be a mirror image of the first.
The gloves work up so quickly it is not too traumatic to pull them out and start over if you want to adjust the pattern.
Experiment with different weight and textures of yarn and have fun!
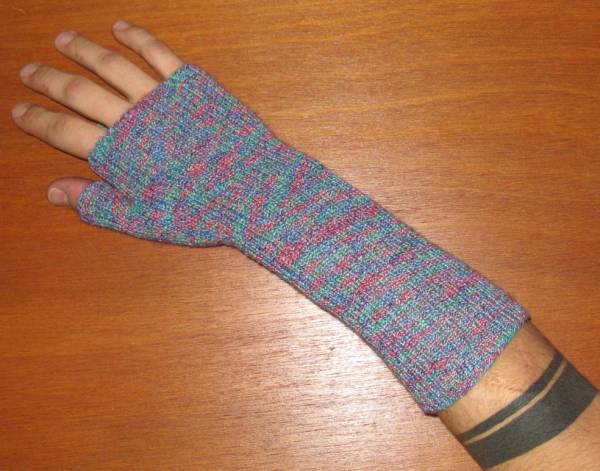
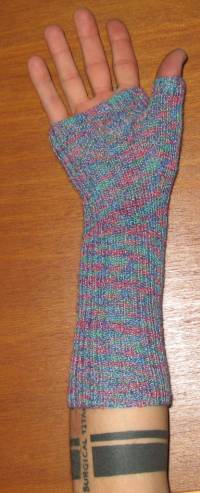 I used a variegated SOCKOTTA yarn and size one double pointed needles for this geek-glove variant. Instead of K2P2 ribbing, K1P1 was used with 60 stitches for the long cuff. The long cuff can be folded up and hand warmers inserted into the fold on days when extra warmth is needed.

Oh, as a bit of administrative verbage: This pattern is free for personal use and can be shared with others, but please credit the creator,
Gloria Binette. The directions are generalized and may not be mistake free. Experienced knitters should be able to easily create their geek gloves using the directions as a framework.
This is simply my attempt to share a useful creation that has improved my time at the keyboard!
Gloria

copyright © 2004-2023 Gloria Binette and David Binette ALL RIGHTS RESERVED