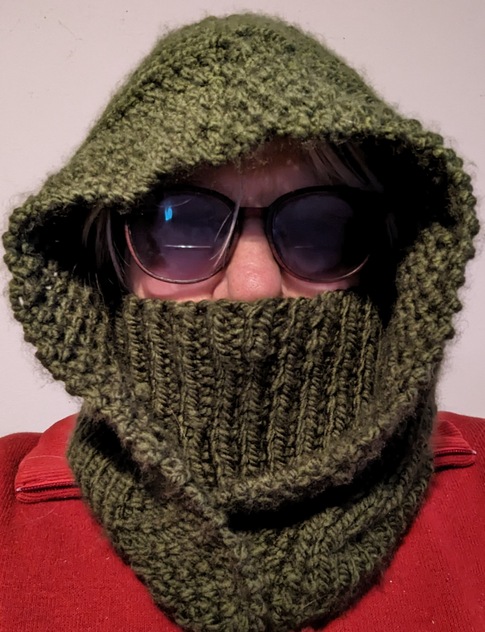
This is a recipe for making a winter head warmer that is part cowl and part hood. For those worried about hat hair, this might solve the problem in that while it is a warm covering, it should not be tight on your head.
This recipe can be modified to use a lighter yarn or heavier. Do stitch swaths in rib and stockinette stitch and adjust the stich counts as needed. Also please knit a bit and try it on. Knitting is a journey so don't be afraid to experiment and tweak it to find your perfect fit.

Material List
Hat Hood General Directions:
Using the size 11 needles cast on 54 stitches and work k1p1 in the round for 7 inches.
The neck should be about 17 inches in circumference and be snug but not tight. Check the length. It should go from your nose to the base of your neck.
Create an overlap area by knitting a stitch into the back of the next 5 stitches From now on work rows back and forth, not as rounds.
NOTE: When wearing, fold the ribbed neck area up towards your chin, the overlapped row will be at the bottom of the HatHood.
- Using the size 13 needles, knit the 5 new stitches, incr1 1 stitch in the next stitch, *** knit 10, incr 1 stitch in the next stitch, repeat from ** until 5 stitches remain. Knit to end (64 stitches)
- Work in seed stitch2 for 5 stitches, purl to 5 stitches before end of row, work in seed stitch to the end of the row
- Increase one stitch, work in seed stitch for 4 stitches, knit to 5 stitches before the end of the row. Work in seed stitch for 4 stitches, increasing one stitch in the last stitch
- Work in seed stitch for 6 stitches, purl to 6 stitches before end of row, work in seed stitch to the end of row
- Increase one stitch, work in seed stitch for 5 stitches, knit to 6 stitches before the end of the row. Work in seed stitch for 5 stitches, increasing one stitch in the last stitch
- Work in seed stitch for 7 stitches, purl to 7 stitches before end of row, work in seed stitch to the end of row
- Increase one stitch, work in seed stitch for 6 stitches, knit to 7 stitches before the end of the row. Work in seed stitch for 5 stitches, increasing one stitch in the last stitch
- Work in seed stitch for 8 stitches, purl to 8 stitches before end of row, work in seed stitch to the end of row (70 stitches)
- Work in seed stitch for 8 stitches, knit to 8 stitches before end of row, work in seed stitch to the end of row
During a knit row, work the 8 seed stitches then increase 3 stitches evenly spaced in the knit stitches then work last 8 stitches in seed stitches. (73 stitches)
After about 2 more inches, increase 3 stitches evenly spaced during a knit row. (76 stitches)
NOTE: Try it on periodicaly and increase more stitches if desired.
Repeat rows 8 and 9 until 7 inches from the start of the seed stitch. Try it on.
If it seems like the back is coming up higher than the front, work short rows as follows.
- Start row 8 Work in seed stitch for 8 stitches, purl 14 stitches, turn and knit to 8 stitches before the end. Work in seed stitch to the end.
- Work row 8
- Start row 9 Work in seed stitch for 8 stitches, knit 14 stitches, turn and purl to 8 stitches before the end. Work in seed stitch to the end.
- Work row 9
Repeat rows 8 and 9 until 15 inches from the start of the seed stitch. Try it on.
Decide if it needs a few more inches before sewing the seam.
In the example project it felt like there was too much material in the back which may create a pointy effect.
If you like it as is, work to the desired length and use kitchener3 stitch or your favorite seaming technique to close.
To avoid a pointy back to the hood
Place marker in the middle of the row.
Start on (9) Knit row. Work to 5 stitches before marker, ssk4, knit to 5 stitches beyond the marker and knit two together. Work to the end of the row.
Work a (8) Purl row
Work a (9) Knit row. Work to 3 stitches before marker, ssk, knit to 3 stitches beyond the marker and knit two together. Work to the end of the row.a
Work a row (8) Purl row
Work a (9) Knit row, work to 5 stitches before marker, ssk, knit to 5 stitches beyond the marker and knit two together. Work to the end of the row.
Work a row (8) Purl row
Start on (9) Knit row, work to 7 stitches before marker, ssk, knit to 7 stitches beyond the marker and knit two together. Work to the end of the row.
Work a (8) Purl row
Work a (9) Knit row, work to 5 stitches before marker, ssk, knit to 5 stitches beyond the marker and knit two together. Work to the end of the row.a
Work a row (8) Purl row
Work a (9) Knit row. Work to 3 stitches before marker, ssk, knit to 3 stitches beyond the marker and knit two together. Work to the end of the row.
Work a row (8) Purl row.
Try it on. Adjust the rows if desired.
Use kitchener stitch or your favorite seaming technique to close.
Finished Dimensions

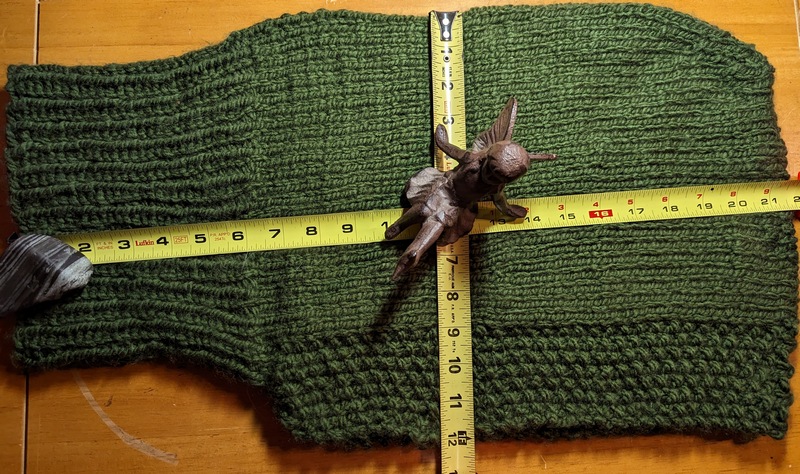
Laying flat, the example hat hood is 22 inches from bottom to top and a 12 inches wide (folded in half). The back of the hood (shown at the top right) is curved using the technique outlined above.
***** Term Definitions *****
- inc: Increase
- seed stitch: First row Row Knit one, Purl one for number of desired stitches. In subsequent rows, Knit the Purl stitches and Purl the knit stitches.
- Kitchener Stitch - A way of seaming with live stitches. There are many wonderful videos and text instructions that will walk you through how to do it if you are unfamiliar with the technique.
Once you have watched a video or two, the following will make sense- Set Up
- Purlwise through first stitch in front, Leave On
- Knitwise through first stitch in back, Leave On
- Repeat these until all the stitches have been dropped
- Front Stitch Knitwise, slip off
- Next Front Stitch Purlwise, leave on
- First Back Stitch Purlwise, slip off
- Next Back Stitch Knitwise, leave on
- Set Up
- SSK: Slip Slip Knit - slip 1 stitch to the right needle, slip the next stitch to the right needle and knit both together
As a bit of administrative verbage: This pattern is free for personal use. Please feel free to share the link. Please credit the pattern creator, Gloria Binette, when displaying a finished HatHood. The directions are generalized and may not be mistake free. Experienced knitters should be able to easily create their hat hoods using the directions as a framework.
Gloria
